Building a basic template - Part 1
In this tutorial I will show you how to create a very basic HTML template.
I will also cover some basic SEO (Search Engine Optimalisation) techniques, since we all like to be able to be found by Search Engine’s like Google.
Notice!: We aren’t yet building a WebsiteBaker template, in the next tutorial I will be showing you how you can port the demo template to WebsiteBaker.
 Step 1: Scribbling the global idea.
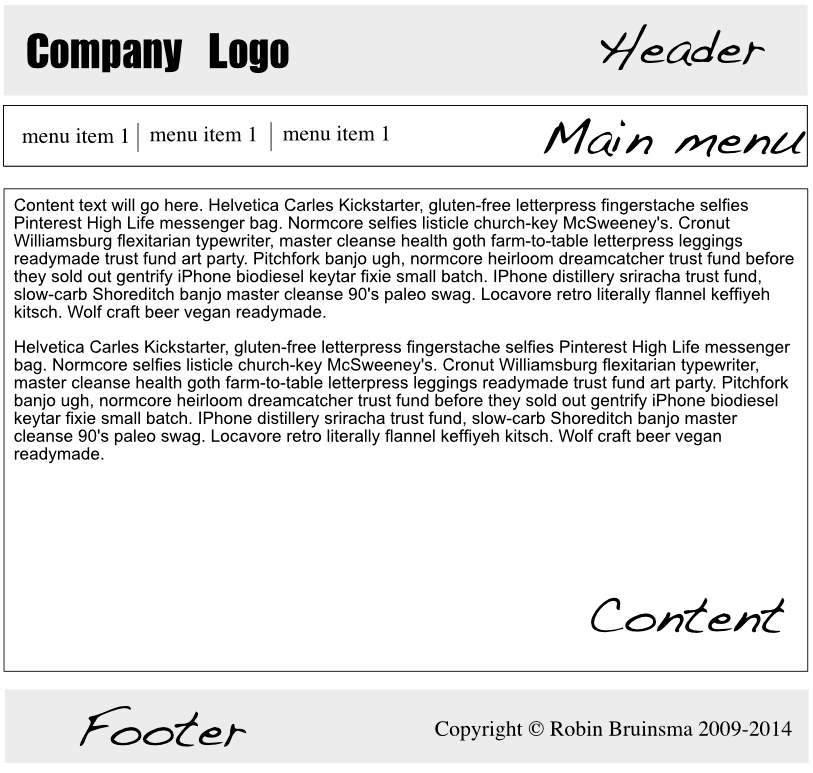
Weather doing a project for yourself or for someone else it’s always a good idea to grab a pen and a piece of paper and draw the global lines of what you are aiming to achieve. (You can also use a prototyping program, but pen and paper will also do). For this example we are aiming to create a really simple basic template, so I created a very basic prototype (nothing really fancy but you’ll get what we’ll be trying to create. The prototype isn’t a definitive decision of how the website should look like, it’s just a rough sketch of where all the necessary stuff goes like a logo/name, the main menu, the content, and a footer.
Step 2: Creating a project folder.
First of all when I build a template I always create a new folder on my computer specific for this project. This folder will hold all the necessary files. For this example create a folder called basic-template.
Step 3: Create the basic HTML.
Now lets open your favorite text/code editor in my example I am using Coda 2 (specific for mac users) but you can use anything you like EVEN notepad will do!
Now you should have a blank page in front of you, I like to see this as my canvas because this is where I will be ‘painting’ all my code on.
Lets insert the basic code a template needs:
<!DOCTYPE html>
<html lang="en">
  <head>
  <meta charset="utf-8">
  <title>Page title - Website title</title>
  <link rel="stylesheet" href="style.css">
</head>
<body>
</body>
</html>
Now we really have the basics we need I will not be explaining all this step-by-step because there are plenty website’s that will eg.: http://www.w3schools.com/html/default.asp
Now save the file to the folder (basic-template) we created earlier on, give the file the name index.html
Step 4: Create the basic CSS.
For people who don’t know what CSS stands for and it is used (you don’t need the knowledge to complete this tutorial so you can also check later on) check: http://www.w3schools.com/css/css_intro.asp.
If you don’t have your text editor open anymore open it again and save (the empty page!). Save the file to the folder (basic-template) we created earlier on, give the file the name style.css.
Step 5: Adding elements to the HTML page and style them using CSS.
Open index.html, if you look at the 6th line you see <link rel="stylesheet" href="style.css"> thanks to this line of code our HTML document ‘knows’ where the styling information for the page is stored.
Now we will be adding some content blocks to our page, the real visible things in a website are between <body> and </body>. The HTML document will only display the content to visitors between these tags.
Looking at our initial sketch we have 4 different area’s namely header, main-menu, content, footer.
In our code we will put the area’s in a wrapper (this wrapper contains all the area’s) later in the tutorial you will see why I use a wrapper.
Now in the empty line between the body tags we will create the basics.
<body>
  <div class="wrapper">
    <div class="header"></div>
    <div class="main-menu"></div>
    <div class="content"></div>
    <div class="footer"></div>
  </div>
</body>
After adding this we will add some example content, because if we don’t we can’t see how the content is styled.
Further on in this tutorial we will get back to this example content and why it’s formatted like that (e.g. the menu).
Our index.html now looks like:
<!DOCTYPE html>
<html lang="en">
<head>
  <meta charset="utf-8">
  <title>Page title - Website title</title>
  <link rel="stylesheet" href="style.css">
</head>
<body>
  <div class="wrapper">
    <div class="header"><h1>Company Logo<h1></div>
    <div class="main-menu">
      <ul id="nav">
        <li><a href="#">Menu item 1</a></li>
        <li><a href="#">Menu item 2</a></li>
        <li><a href="#">Menu item 3</a></li>
      </ul>
  </div>
  <div class="content">
  <p>Lorem ipsum dolor sit amet,
 consectetur adipiscing elit. Integer nec odio. Praesent libero.
Sed cursus ante dapibus diam. Sed nisi. Nulla quis sem at nibh elementum imperdiet.
Duis sagittis ipsum. Praesent mauris. <b>Lorem ipsum dolor sit amet,
 consectetur adipiscing elit</b>. Fusce nec tellus sed augue semper porta.</p>
  </div>
  <div class="footer">
    Copyright © Robin Bruinsma 2014
  </div>
</div>
</body>
</html>
Step 6: Basic styling.
If you don’t have it open anymore open style.css.
Wrapper:
Lets start by adding the basics, we want the page be centered and have a width.
You can do so by adding style to the .wrapper (the dot in css means class, we are looking to style class=”wrapper” so in our css we use .wrapper).
So we start by putting code in our, to this point empty, style.css.
.wrapper{
	width: 940px;
	margin: 0 auto;
}
We are giving the wrapper a width because if we don’t we can’t center the wrapper (because then the wrapper will be 100% screen width). Next to giving our wrapper a width we are giving it a margin. Margin: 0 auto; the first number is for top and bottom margin and the second is for the margin left and right. So we are giving our .wrapper a top and bottom margin of 0, And giving it a auto margin left and right. The margin auto will ‘calculate’ automatically the same margin left and right, so our website will be centered right now.
Header:
Now lets add style to the .header, add the following to your style.css
.header {
	background: #eee;
	height: 100px;
}
The header now has a light-grey background and is 100px high.
Also let’s style the <h1>Company Name<h1>, every tag <h1> to <h6> is called a heading, Search-engines like headings. But don’t over-use them, because than search-engines will punish your site and will not show your site in the search results as often.
Lets style the heading:
.header h1 {
	font-size: 50px;
	font-weight: bold;
	padding-top: 20px;
	padding-left: 15px;
	margin: 0px;
}
We’re using .header h1{} because then we know for sure the styles we write will only affect the h1 tags within the <div class=”header”></div>
Main-menu:
I almost never build my menu from scratch; this is a time consuming and difficult thing to build. I download some basic CSS from a website, in this example I use:
http://www.sanwebe.com/2013/06/multi-level-dropdown-menu-css.
I will add my own styling, but why reinvent the wheel?
This is the complete CSS for the menu, with extra additions:
#nav{
    height: 40px;
    margin: 0;
    padding: 0;
    font-size: 14px;
}
#nav li{
    list-style: none;
    display: block;
    float: left;
    height: 40px;
    position: relative;
    background: white;
}

#nav li a{
    padding: 0px 10px 0px 10px;
    margin: 0px 0;
    line-height: 40px;
    border-right: 1px solid #ddd;
    height: 40px;
}
#nav ul{
    padding: 0px;
    width:170px;
    border:1px solid #ddd;
}
#nav li a{
    display: block;
    color: #000;
}
#nav li:hover {background: #eee;}
#nav ul li {
    border-right:none;
    border-bottom:1px solid #DDDDDD;
    width:170px;
    height:39px;
}
#nav ul li a {
    border-right: none;
    border-bottom:1px solid #FFFFFF;
}

/* Sub menus */
#nav ul{
    display: none;
    visibility:hidden;
    position: absolute;
    top: 40px;
}
/* Sub menu indicator */
#nav li a:after {
    color: #444;
    content: ' ▼';
    font-size: 10px;
}
#nav li li a:after {
    content: ' ▶';
}
#nav li > a:only-child:after {
    content: '';
}
/* Third-level menus */
#nav ul ul{
    top: -1px;
    left:170px;
    display: none;
    visibility:hidden;
    border: 1px solid #DDDDDD;
}
/* Fourth-level menus */
#nav ul ul ul{
    top: -1px;
    left:170px;
    display: none;
    visibility:hidden;
    border: 1px solid #DDDDDD;
}

#nav ul li{
    display: block;
    visibility:visible;
}
#nav li:hover > ul{
    display: block;
    visibility:visible;
}
Content:
For the content we also need some styling:
.content {
	border: 1px solid black;
	padding: 10px;
}
.content p {
    display: block;
    margin-top: 1em;
    margin-bottom: 1em;
    margin-left: 0;
    margin-right: 0;
}
We are styling the .content (container) as well as the content which will be most-likely be in paragraphs (<p></p>)
Footer:
For the footer we are adding a background, and giving it some height. We also add a line-height that will be the same height as the footer so the text in the footer will be centered vertically.
We are also adding some padding-right to have the text-aligned 10px from the right.
.footer {
	background: #eee;
	height: 50px;
	line-height: 50px;
	text-align: right;
	margin-top: 10px;
	padding-right: 10px;
}
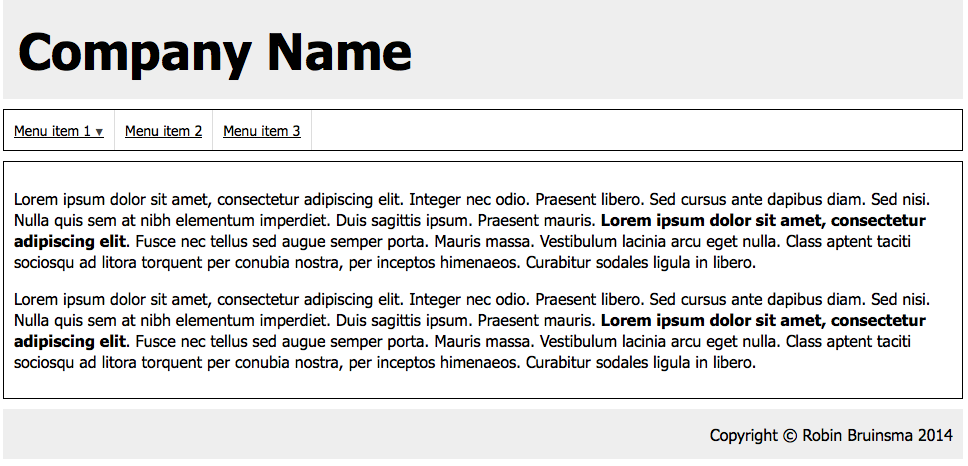
Step 7: End result.
Now we can watch the end result in a browser.
Go to the project folder basic-template and right click the index.html and open it with your Internet-browser (e.g. Firefox).
As an extra you can download the completed HTML template created during this tutorial. For demo purpose I added some extra levels to the menu to show that we have 4 levels :-).
Notice this isn’t an installable template for WebsiteBaker.
Download the completed HTML version of basic-template
In the next tutorial I will show you how to port this template to WebsiteBaker.
Related articles
Building a basic template - Part 2
By Robin Bruinsma - Nibz
Porting template to WebsiteBaker
Hi there, and welcome to the second part of my tutorial.
In the first part of the tutorial we built a HTML template, in this part we are going to convert it to a folder with files that WebsiteBaker will understand (further on I will call this ‘porting’ just like in the title of this tutorial).
Share this page


