Installing WebsiteBaker (version 2.8.3)
This article will try to help you with the installation of WebsiteBaker on your webserver.
For the installation you will need FTP access to a webserver, and you should be able to create a database for WebsiteBaker to store its content.
WebsiteBaker will work fine on most (budget) hosting services. The current requirements for the server can be found on the WebsiteBaker website.
Prepare your webserver
This part assumes you have rented some hosting webspace and have a domainname linked to that space.
When you enter your domainname in your browser your should see some default message about your website/domainname.
There are many different hosting companies with a lot of different methods for managing your account. So it will be impossible to give detailed instructions about prepairing the server.
If the general instructions below do not work for you you should ask your host for assistance!
- You should have received access to a webserver controlpanel by your hosting company and/or FTP and database login details.
- Log in to your controlpanel.
- Create a new database (and if needed a database user)
- Make sure you write down the name of the database as well the database username and password.
- Mostly the database server will be the same as the webserver (called localhost), but sometimes it will be a different named server. If so, make a not of that name too!
- If you did not yet received details for FTP login in your server you might need to create a FTP account also.
- If so, write down the username and password for your FTP server after creating them.
Now you are ready to install WebsiteBaker on your server.
Download WebsiteBaker
- Go to the download pages of the WebsiteBaker website (this is the only guaranteed place to downlod the package) and download the latest version to your computer.
- Unpack the zipfile to a local folder on your computer.
- Connect to your webserver with your favourite FTP program and navigate to the root folder of your website. Typically this folder is named "public_html" or "www".
- If you are not sure, ask your hoster for the correct location.
- Upload all files from the local folder "wb" in the root of your website. (do NOT include the folder itself!)
If all is uploaded correctly your root directory should have an index.php and a config.php.new listed. - Rename the file config.php.new to config.php
- Use your browser to navigate to your website and start the installation procedure.
Installing WebsiteBaker
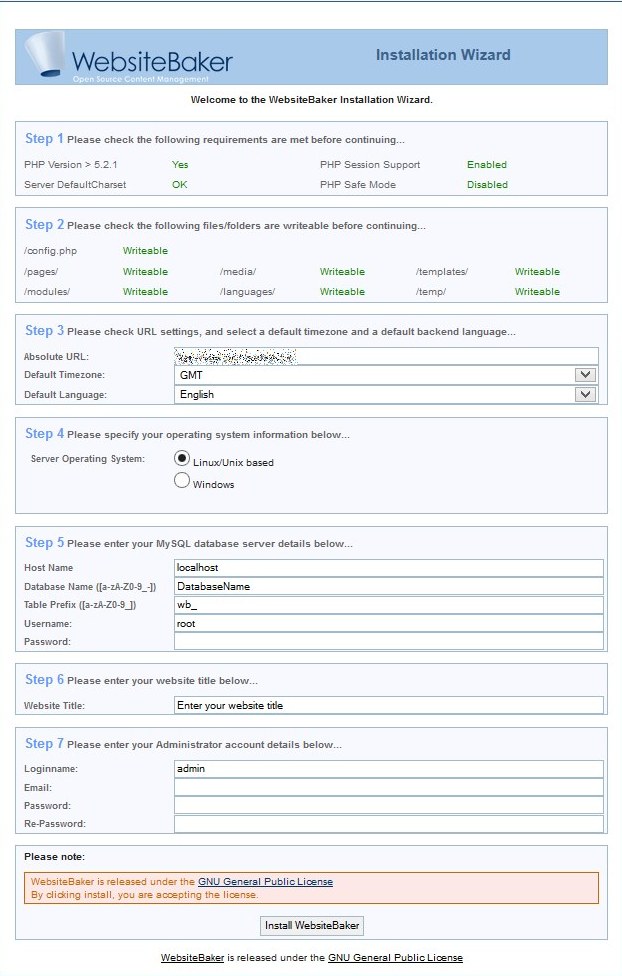
 If all went ok you should now see the WebsiteBaker Installation Wizard.
The first 2 steps of the wizard will show you if everything is tested ok for the installation. If you do not see any red messages (all should be green) you can continue.
If you see errors in step 2 (folders should be writable) you should read this article about permissions in Linux server.
Step 3 will show you the url you have used to start the wizard. Note that if you want your website to work using www.yourdomainname.com, it should be written that way in this inputfield.
Select the correct timezone and language your website will be using.
Step 4 will allow you to choose between Unix and windows servers. If you are not sure about this, leave the selection to the default setting (Unix).
Step 5 will allow you to give the settings of your database.
Either use the setting you have received from your hoster or the data you wrote down in the first steps of this tutorial.
Unless you use more than one WebsiteBaker installation on this database you should leave the "table_prefix" to its default value. If you install a second WebsiteBaker change the prefix to something else (i.e. wb2_)
Step 6 asks for the title of your website. Do not worry, you can change it later.
Step 7 (the final step) creates the administrator. This will become the superuser in this installation, so be carefull choosing a good and safe password.
It is advisable to change the default loginname to something else than "admin". The loginname "admin" will be the first to try by hackers.
Finally, click on "Install WebsiteBaker" to complete the installation.
If all went succesfull the wizard will show the login screen of your website.
Before logging in you should remove (by using your FTP connection) the directory "install" as well as the file "upgrade-script.php" from your websites root directory.
Login to your brandnew CMS and start building your website.
This article is tagged with:
Installation WebsiteBaker 2.8.3
Related articles
Permissions in your webserver
Not really a WebsiteBaker issue, but it is one of the most seen cause of problems.
A *nix (unix/linux) webserver uses a permissions method a bit different from what most people are used to see in Windows.
Files and directories are owned by a user in the system. All files can have permissions set to read/write/execute by the owner of the file, or by the group a user belongs to or just by everyone.
Finding modules for your website
If you need your website to do something more than display text and an occasional image you might need a module to enhanche the CMS's functionality.


